Are you also a Dell Laptop User and looking for a way to do screen recording on your laptop?
If Yes, then you have come to the right place!
In this guide, we are going to discuss the top 5 ways that you can record your screen on a Dell laptop. All you have to do is to install a good and trustworthy screen recorder.
You can use the screen recording in several works, such as making tutorials, recording your screen to share with your colleague or friends, recording the gaming videos to post on Youtube, etc.
Let’s begin the recording tutorial!!
Top-5 Ways to Screen Record On Dell Laptop
- Record with Game Bar
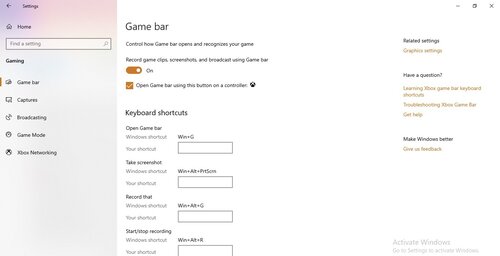
Almost all Dell laptops have Windows 10. If you also have a windows 10 installed on your dell laptop, then it would have an in-built screen recorder named Game Bar. You can easily record your screen and take screenshots with the help of the Game Bar.
In this screen recording, you can include the system’s internal voice or external audio through the mic. Here, you can also see the performance of your system through the widgets. You can share these screenshots and screen recordings anywhere easily.
Here we’ve mentioned a step-by-step process of screen recording on a Dell laptop with the help of the Game Bar in Windows 10.

Step #1: Click Windows +G keys to access the Game Bar on your Dell Laptop.
Step #2: Start preparing the screen you’re going to record. Once you get ready, press the “Record Button” on the capture tool so that you can start the recording.
In short, you can directly start recording with a shortcut key – Windows + Alt + R keys simultaneously.
Step #3: Once you’re done with the recording and want to stop the recording, just again press the Windows + Alt + R keys together.
You can watch the recorded video in the Widgets > Gallery.
- Record Screen of Your Dell Laptop With EaseUS RecExperts
EaseUS RecExperts is one of the market’s most trending and on-demand screen recorders. This software is highly compatible with the Dell Laptop and offers many valuable features.

You can either record the whole or part of the screen and save them in any of your suitable formats. Moreover, the best thing we like about the EaseUS RecExperts is that you can simultaneously record the screen with a webcam and internal or external audio.
All the decent Dell Laptops have an in-built snapping tool that helps in capturing screenshots in a single click.
Here, we have mentioned the step-by-step process of how to screen record on a Dell laptop.
Step #1: First, you must download and launch the EaseUS RecExperts. You will get two options for recording the screen, i.e., Full-Screen Recording or Region.
Step #2: In the Full-screen recording, the software automatically starts recording the entire
Step #3: In the Region recording option, you will be asked to customize the recording area on display. So, you must ensure all the places you want to record should be within the box.
Step #4: You can see a button on the bottom left side of the main screen; press the button, and you will see several options. You can record the internal system audio and external mic audio simultaneously or separately.
In the last, you can see the options button for adjusting the volume and microphone device.
Step #5: If you want to start the webcam simultaneously, you can click on the “Webcam” icon at the bottom of the interface.
Once you click the button, you will have the drop-down menu, where you can select the recording device. Then proceed with the Ok.
Step #6: When you return to the main interface, press the “Rec.” button. You will have a control bar, which can help you pause or stop the recording after starting. You can also take screenshots while recording with the help of the “camera icon.”
Step #7: You can see your recorded videos on your laptop. And the best part is that you can edit the video right from there.
Due to the most advanced and high-quality features, we recommend this software moreover any other.
- Use VLC Screen Recorder
Although Windows has its default media player known as “Windows Media Player,” the popularity and preferability of the VLC Media Player are much higher.
People prefer the VLC Media Player because it is highly customizable and supports almost all video formats. Moreover, you can also use the VLC media player to record your laptop’s screen and watch the recording directly on the VLC media player.
Here we have mentioned an easy step-by-step process of how to record your laptop’s screen with the help of a VLC media player.

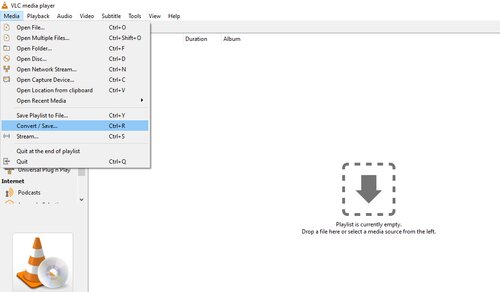
Step #1: Open the VLC media player and look for Media > Convert/ Save Option.
Step #2: Open the capture device tab and change the capture mode setting to Desktop mode.
Step #3:
- Go to the destination section.
- Press the Browser.
- Choose the destination folder, and also not forget to mention the destination file name.
Step #4: You can see the recording button on display, so click on it to start the recording. Once you start the recording, you can see the controls to stop the recording.
Your recording will be saved into the destination file you have a step before.
- Record Dell Screen with OBS
OBS studio is one of the best open-source screen recorders, and it can quickly help you record the screen of your Dell laptop. OBS is an entirely free-of-cost software with highly advanced and customizable configuration settings.
Almost everyone uses the OBS Studio to do live streams or record their videos and post on social sites such as YouTube.
Here we have mentioned a step-by-step process to record screens on Dell laptops through OBS Studio.
Step #1: First, you must download, install and launch the OBS Studio on your Dell Laptop.
Step #2: Open the sources tab, and you will see a “+” icon there; press the icon. Now, choose the display capture present in the menu.
Step #3: Select the name of your display capture session, and press the Ok button. You can easily select the one you want to record from the multiple display units.
Step #4: Once selected, you can see your display screen on the OBS windows. Under the control tabs, you can sew the Start Recording button, click on that, and the recording will begin in the background.
Step #5: When you finish your recording, you can quickly stop the recording from the OBS Studio.
- Use Screencast-O-Matic to Record Dell
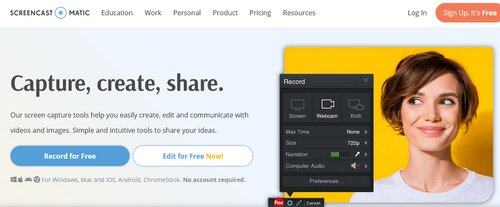
If you’re not willing to install any dedicated screen recorder on your Dell Laptop, you can also install an online screen recorder named “Screencast-O-Matic.” You only need to install a simple web launcher here on your Dell Laptop, and you can start recording anytime through their official website.
You can easily access the webcam with the help of this online software and take the system audio and external mic audio so that you can also do the commentary if you want.
Here we have mentioned a step-by-step process to record screens on Dell laptops through Screen-O-Matic.

Step #1: Firstly, you need to open the official website “screencast-o-matic.com,” and you can see the Record for Free button.
Step #2: You can see the option of “Launch Free Recorder” there; press the button, and you will get your web launcher.
Step #3: You need to search for “screencast-o-matic.com/screen-recorder.” And, then you will see the Launch Free Recorder button there; press the button.
Step #4: Once you have this online software on your display, you need to select the Screen option and the required changes.
Step #5: You can spot the recording button at the top-left corner of the screen. Click here to begin the game.
Step #6: When you’re done with the recording, you can press the Pause button beside the Done button.
Conclusion
If you have a Dell Laptop and find genuine ways to record your laptop’s screen, then we have mentioned the top-5 ways to do so in this article.
Among all the five options, we recommend the OBS Studio and EaseUS RecExperts to record the screen because these two come with so many other features.
But, our favorite is the EaseUS RecExperts due to its exclusive features, and you can use this software as a screen recorder with internal audio.
We hope this article helps you and lets you get your best suitable option.

